
Disclaimer: let's be upfront:
kftraymight not be for you. if you only needkubectl port-forwardfor rare, simple tcp connections and don't have problems with dropped connections or lots of terminals, then addingkftraycould be unnecessary overhead. the standardkubectlcommand is probably fine. however, if you find yourself needing more reliable connections, udp support, proxying capabilities, or a better way to manage multiple forwards, thenkftrayits useful with those specific workflows.
so, let's talk about port-forwarding into kubernetes during development. we all use kubectl port-forward for this. it's the standard tool, and it does the job for tcp connections, but it can get a bit awkward. managing lots of forwards means handling a lot of terminals, it doesn't handle udp, and it's odd when connections drop just because a pod decided to restart.
that's basically why kftray exists. it's a tool meant to manage these port-forwards more smoothly. it runs as a background app, usually sitting in your system tray, and provides a central place to handle your connections. instead of running kubectl commands manually for each forward, you define them once inside kftray.
for those interested in the tech stack, kftray is built using rust for the core backend logic, typescript with react for the gui frontend packaged with the tauri framework, and rust again using the ratatui framework for the terminal ui kftui.
kftrayruns completely locally and includes no tracking or telemetry (like sentry or google analytics)
the standard kubectl port-forward way
before explaining kftray, let's quickly revisit the standard kubectl port-forward workflow. typically, you open a terminal and run something like kubectl port-forward service/my-service 8080:80. If you need another forward, you open another terminal and run another command. need five forwards? That's five terminals, each dedicated to keeping a tunnel alive.
This works, but it has a few well-known rough edges:
- terminal clutter: managing many separate terminal windows just for port-forwards gets messy.
- no udp: native
kubectl port-forwardprimarily handles tcp. getting udp traffic through is often complex or impossible. - connection drops: if the specific pod the forward is connected to restarts or gets rescheduled by kubernetes, your connection breaks. you then have to manually restart the
kubectlcommand. - manual management: remembering which command corresponds to which service, especially across projects or contexts, relies entirely on you.
these are the kinds of daily friction points that kftray aims to smooth out.
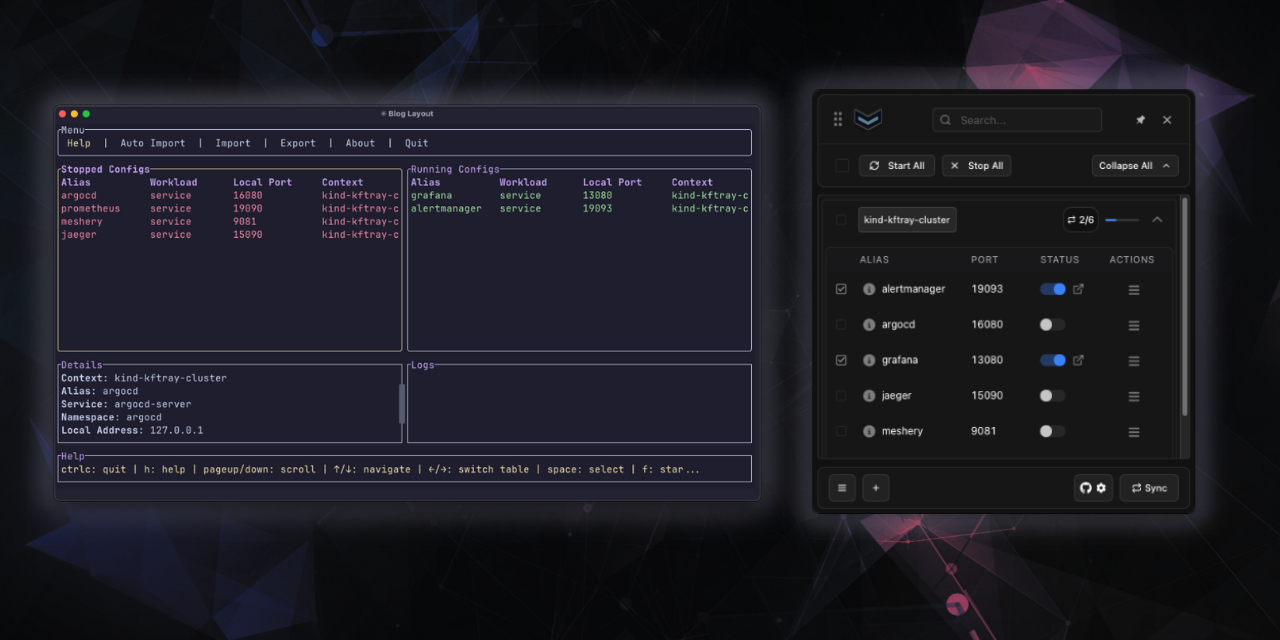
gui and terminal options
kftray have two ways to interact with it. the default is a graphical application (kftray) - a gui with windows and buttons that runs from your system tray icon. however, if you prefer working in the terminal or need to manage forwards over an ssh connection, there's also kftui. this provides a full terminal user interface (tui) allowing you to perform the same core tasks: listing configurations, starting/stopping forwards, importing settings, etc., all within your terminal window. both kftray and kftui use the same underlying engine and configuration data, so you can use whichever interface suits your current workflow.
how it works day-to-day
setting up a forward involves telling kftray the usual details: which kubernetes context to use (from your normal or a custom kubeconfig file), the kubernetes namespace, the name of the service (or specific pod label) you want to reach, the port number the service uses inside kubernetes (like 8080), the local port you want on your machine (like 9000), and optionally a specific local_address to bind to instead of the default 127.0.0.1. giving it a simple name or alias helps keep things organized when you have several configurations. you also specify if it's a standard service/pod forward or if it needs proxying (more on that later).
all your saved configurations show up in the app's list. from there, you can easily turn the port-forwards on or off with a click. if you need to connect to multiple services for your project, you can often start them all together.
introducing the kftray-server
now, for things beyond basic, tcp forwarding (specifically, handling udp traffic or proxying to destinations outside the cluster), kftray relies on a component called kftray-server. this is a small application that acts as a relay or bridge inside your target kubernetes cluster.
instead of requiring you to manually deploy this server, the kftray GUI and kftui applications handle it automatically. whenever you start a UDP or proxy-type port forward within the app, kftray uses a manifest template found at ~/.kftray/proxy_manifest.json to deploy a new instance of the kftray-server pod in the specified namespace. (if you need to customize the pod definition, for example to adjust resource limits or add specific tolerations, you can modify this proxy_manifest.json file directly before starting the forward.) this pod exists only for the duration of that specific forward.
the manifest template looks something like this (the app fills in the specific values like ports, addresses, and a unique name based on your configuration):
{
  "apiVersion": "v1",
  "kind": "Pod",
  "metadata": {
    "name": "{hashed_name}",
    "labels": {
      "app": "{hashed_name}",
      "config_id": "{config_id}"
    }
  },
  "spec": {
    "containers": [
      {
        "name": "{hashed_name}",
        "image": "ghcr.io/hcavarsan/kftray-server:latest",
        "env": [
          {
            "name": "LOCAL_PORT",
            "value": "{local_port}"
          },
          {
            "name": "REMOTE_PORT",
            "value": "{remote_port}"
          },
          {
            "name": "REMOTE_ADDRESS",
            "value": "{remote_address}"
          },
          {
            "name": "PROXY_TYPE",
            "value": "{protocol}"
          },
          {
            "name": "RUST_LOG",
            "value": "DEBUG"
          }
        ],
        "resources": {
          "limits": {
            "cpu": "100m",
            "memory": "200Mi"
          },
          "requests": {
            "cpu": "100m",
            "memory": "100Mi"
          }
        }
      }
    ]
  }
}
this on-demand deployment means you don't need to pre-install or manage the kftray-server separately; the client application takes care of spinning it up and tearing it down as needed for each UDP/proxy connection.
kftray-server architecture reference
handling udp forwarding
standard kubernetes port-forwarding doesn't work well, if at all, for udp traffic. kftray gets around this limitation by using the kftray-server pod. when you configure a udp forward in kftray:
the tool opens the specified local udp port on your machine and establishes a standard tcp port-forward to the kftray-server pod in your cluster. when your local app sends a udp packet to that local port, kftray wraps the packet inside the tcp tunnel to the kftray-server. the server then unwraps the original udp packet and forwards it to the target service within the cluster. responses follow the reverse path: udp from the target to the server, wrapped in tcp back to kftray, and finally delivered as udp to your local application.
so, kftray-server bridges the udp traffic over a reliable tcp tunnel provided by the native kubectl port-forward.
using kftray-server for proxying connections
the kftray-server is also used for the "proxy" mode. this mode lets you connect from your machine, through the kubernetes cluster, to a destination that's outside kubernetes itself but reachable from the cluster's network (like a database in a private vpc).
when you set up a proxy configuration in kftray (like the private-redis-proxy example in the json above), you specify the final destination's address and port (e.g., my-private-redis.internal:6379) and the namespace where kftray-server is running. kftray on your machine connects to the kftray-server pod (via a standard tcp port-forward), and kftray-server then relays the traffic to that final external destination. it acts as a secure jump point using the cluster's network access. this works for both tcp and udp proxying.
managing configurations locally (json format)
kftray has features for managing the configurations themselves. your setups are saved locally (usually in a small sqlite database file at ~/.kftray/configs.db), so they persist between restarts.
here's an example of what that json file looks like, showing different types of configurations kftray supports:
[
 {
   "alias": "web-frontend-svc", // User-friendly name for this configuration
   "context": "dev-cluster",    // Kubernetes context to use (from kubeconfig)
   "kubeconfig": "~/.kube/config", // Path to the kubeconfig file (optional, defaults if omitted)
   "local_port": 8080,          // Port on your local machine to listen on
   "namespace": "webapp",       // Kubernetes namespace of the target workload
   "protocol": "tcp",           // Network protocol (tcp or udp)
   "remote_port": 80,           // Port the target workload is listening on inside Kubernetes
   "service": "frontend-service", // Name of the Kubernetes service to target
   "workload_type": "service",  // Type of workload (service, pod, or proxy)
   "domain_enabled": true       // If true, attempts to add alias as hostname to /etc/hosts (e.g., web-frontend-svc.kftray)
 },
 {
   "alias": "auth-api-pod",     // Alias for this config
   "context": "dev-cluster",    // K8s context
   "local_address": "127.0.0.2", // Specific local IP address to bind to (default: 127.0.0.1)
   "local_port": 9001,          // Local port
   "namespace": "backend",      // K8s namespace
   "protocol": "tcp",           // Protocol
   "remote_port": 8080,         // Port on the target pod(s)
   "target": "app=auth",        // Label selector to find target pod(s)
   "workload_type": "pod"       // Targeting pods directly using labels
 },
 {
   "alias": "cluster-dns-udp",  // Alias
   "context": "prod-cluster",   // K8s context
   "local_port": 5353,          // Local port
   "namespace": "kftray-relay", // Namespace where kftray-server pod will be deployed for UDP
   "protocol": "udp",           // Protocol is UDP
   "remote_port": 53,           // Port on the target service (kube-dns)
   "service": "kube-dns",       // Name of the target K8s service
   "workload_type": "service"     // Still targeting a service, but handled via kftray-server for UDP
 },
 {
   "alias": "private-redis-proxy", // Alias
   "context": "prod-cluster",   // K8s context
   "local_port": 6379,          // Local port
   "namespace": "kftray-relay", // Namespace where kftray-server pod will be deployed for proxying
   "protocol": "tcp",           // Protocol for the proxy connection (can be tcp or udp)
   "remote_address": "redis-master.internal-db.private", // The final destination address (outside K8s, reachable from the cluster)
   "remote_port": 6379,         // Port on the final destination address
   "workload_type": "proxy"     // Workload type is proxy, using kftray-server
 }
]
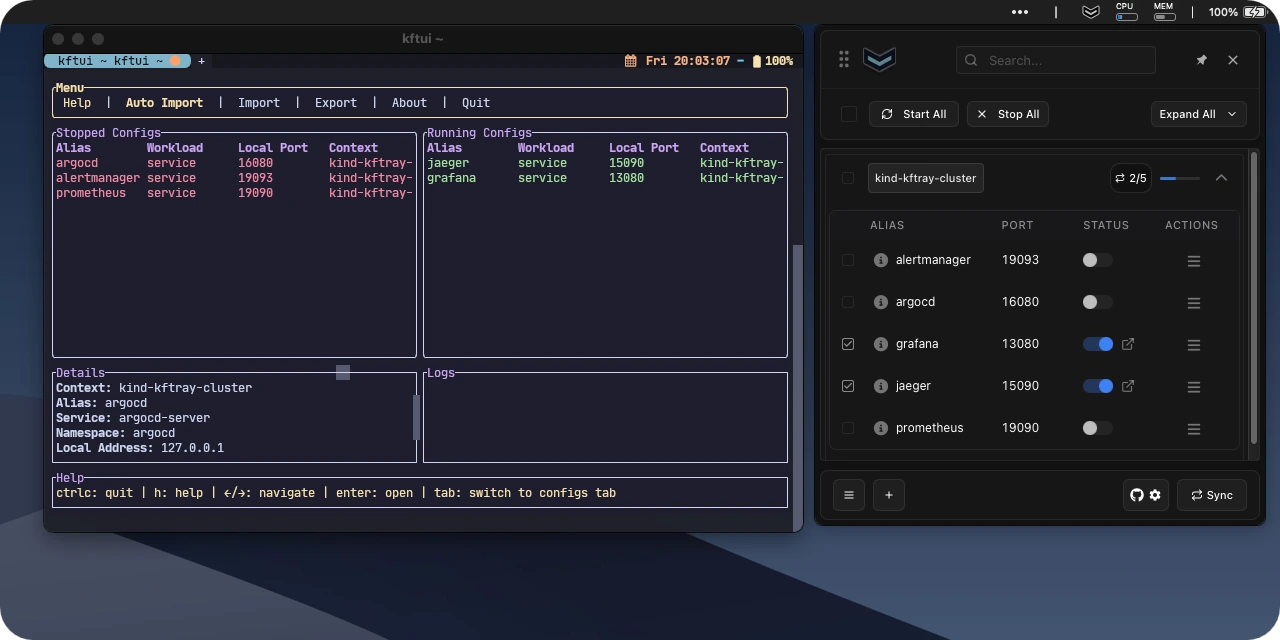
auto-importing configs via annotations
another way to manage configurations is the "auto import" feature, which uses kubernetes annotations. these are like metadata notes you can add to your service definitions in kubernetes. you need to add the required annotation kftray.app/enabled=true to your service manifest. you can optionally customize the imported configuration details using kftray.app/configs="${config.alias}-${config.local_port}-${config.target_port}" (you can adjust the format string here). place these directly into the yaml manifest for your kubernetes services.
to trigger the scan, you go to the main menu in the kftray gui, select the "auto import" button, choose the appropriate kubeconfig file and context you want to scan, and finally click the import button. kftray will then scan your cluster, look for services with these annotations, and automatically create the corresponding port-forward configurations in the tool. this method links the forwarding requirement directly to the service definition, which is convenient if you manage your kubernetes resources using tools like helm or terraform.
for example, if you have this service definition:
apiVersion: v1
kind: Service
metadata:
  annotations:
    kftray.app/configs: grafana-13080-3000
    kftray.app/enabled: "true"
  name: grafana
  namespace: monitoring
spec:
  # ... rest of service spec
when you run the auto-import for the corresponding context, kftray will create a configuration targeting the grafana service in the monitoring namespace, using the alias grafana (from the service name), mapping local port 13080 to the service's port 3000, based on the kftray.app/configs annotation format ${config.alias}-${config.local_port}-${config.target_port}.
importing and exporting configurations
you can also easily export all your current configurations into a single json file, maybe for backup or to manually share with someone. Likewise, you can import configurations from such a json file. this is useful for transferring your setup between machines or restoring from a backup.
<
syncing configs with git
while local export/import is useful, sharing setups often needs a more automated approach, especially for teams. kftray handles this through git integration. it uses that same json format described above.
<
once this git sync is set up, you can configure kftray to periodically check the repository (e.g., every 5 minutes). if it detects changes in the shared json file, it automatically fetches the updates and applies them to your local configuration list. this keeps everyone on the team synchronized with the latest standard port-forward settings automatically.
accessing forwards via hostnames
In addition to accessing forwarded services via localhost:<local_port>, kftray offers a way to use more descriptive hostnames. If you set "domain_enabled": true in a configuration (as shown in the JSON example earlier), kftray will attempt to add an entry to your system's /etc/hosts file when that forward is active.
This entry typically maps 127.0.0.1 to a hostname derived from the configuration's alias, like web-frontend-svc.kftray (using the example alias). This allows you to access the service in your browser or application using http://web-frontend-svc:8080 instead of http://localhost:8080, which can be helpful for avoiding cookie conflicts or simulating different host environments locally.
Note: Currently, for this feature to work, the kftray application needs write permissions to your /etc/hosts file. This often means you might need to run kftray with elevated privileges (e.g., using sudo) or manually adjust the permissions on /etc/hosts. This is not ideal from a security perspective, and work is planned to find a better, less intrusive way to handle local hostname resolution in the future.
using custom local addresses
By default, kftray binds port forwards to the standard loopback address 127.0.0.1. However, you can specify a different address using the local_address field in your configuration, as seen in the JSON example ("local_address": "127.0.0.2").
This can be useful for isolating services or avoiding port conflicts locally. Also, works if you specify a loopback address other than 127.0.0.1, kftray will create automatically a alias on loopback interface for that.
checking http traffic
sometimes during development, especially when working with apis (whether accessed directly or via the proxy mode), you need to inspect the actual http requests and responses flowing through a port-forward. kftray includes an option for this.
the workflow is straightforward: find the configuration row in the kftray gui, click its menu button, and select "enable http traffic logging". after enabling the forward itself and making some requests to it, click the log icon that appears on that configuration's row. this opens the generated log file (found in ~/.kftray/http_logs/) in your default editor.
these log files are formatted specifically to be compatible with the popular rest client extension for visual studio code. if you open the log file in vs code with this extension installed, you won't just see the captured interactions (headers, bodies, status codes, timing) – you can actually click a "send request" link directly above each logged request to replay it instantly. this is incredibly useful for debugging, as you can tweak and resend requests right from the log file without needing to manually reconstruct curl commands or other client setups.
summing up
so, that's the overview of kftray. it's a tool specifically focused on managing kubernetes port-forwards in a development context. it handles tcp connections directly via the api for resilience, and uses a helper kftray-server pod inside the cluster to enable both udp forwarding and proxying to external destinations. it brings features like centralized management, configuration sharing options (local json import/export, git sync, annotations), and http logging together. by offering both gui and terminal interfaces, it tries to fit into different workflows. the main goal is simply to make the common task of connecting to services inside or through kubernetes during development a bit less manual and more reliable. it's built for the dev loop, not as a production networking tool.
if you want to check it out:
as kftray is an open-source tool developed in my free time, if you find it useful, please consider giving the repository a star on github! it really helps motivate further development.
cheers.